How to use OAuth PKCE in client-side JS
2023-05-22
Scroll to commentsYou need to use some API that requires authentication. It doesn't have an SDK. 2 years ago, I was in this position, I started building Timetabl. The API I was using uses OAuth, a protocol for authorising third-party applications, to access a user's data. I started digging through articles about OAuth. Looking at the available libraries for client side OAuth, I didn't seem to have many options. Most JS client libraries were either not actively maintained, didn't support PKCE (Proof Key for Code Exchange), didn't run in the browser, or were too complicated for me to understand.
If you don't understand much about OAuth, or just want a refresher, check out this article for an explainer.
What not to do
Stubborn, I dug into the RFCs for several weeks, and tried to wrap my head around the complexities of OAuth. In around a month I got a basic prototype implementation working. As my application grew, I started to realise that ~90% of my bugs came from that OAuth implementation. As the complexity increased it became almost impossible to maintain. Eventually, I decided to start looking for OAuth libraries again.
A library that makes OAuth easy
After some research, I found badgateway/oauth2-client. It is an excellent library that is actively maintained. I'm surprised it dosen't have a bigger community, so give it a ⭐ and contribute if you can. This library has unit tests, and is fairly well-documented.
Registering your application
Go to the dashboard of your OAuth provider, and create a new application. You will see a page like this:
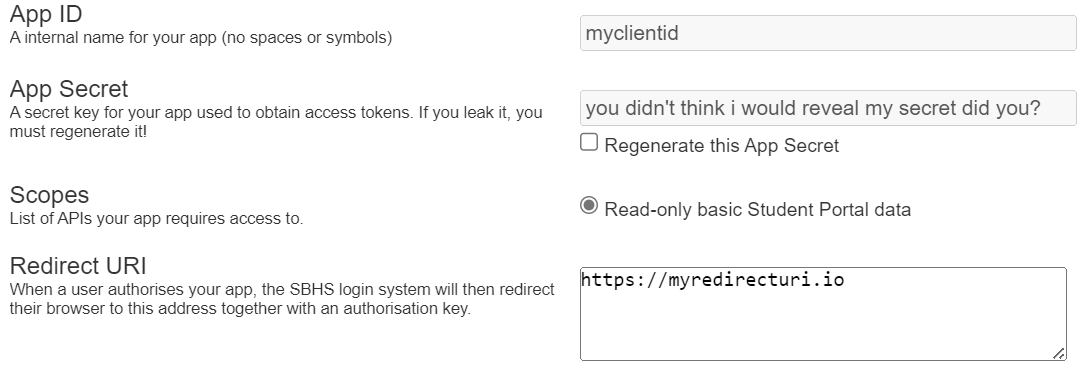
You can ignore the "Client Secret" field, as we will be using PKCE to authenticate. Note down the "Client ID" and "Redirect URI" fields as we will need them for later.
Setting up the library
Install the library with npm:
npm i @badgateway/oauth2-client
Next, setup the client class:
import { OAuth2Client, generateCodeVerifier } from "@badgateway/oauth2-client";

// Replace the following values with your own
const client = new OAuth2Client({
  server: "https://my-auth-server/",
  clientId: "...",
  tokenEndpoint: "/api/token",
  authorizationEndpoint: "/api/authorize",
});
The values for server, tokenEndpoint, and authorizationEndpoint will be in your OAuth provider's documentation. The clientId is the "Client ID" you noted down earlier.
Logging in
Add a login button to your page, and add the following code to the click handler:
const codeVerifier = await generateCodeVerifier();
// You should really dynamically generate a random string, but this is fine for a demo
const state = "some-string";

document.location = await client.authorizationCode.getAuthorizeUri({
  // The redirect uri you noted down earlier
  redirectUri: "https://my-app.example/",
  state,
  codeVerifier,
  // see your OAuth provider's documentation for available scopes
  scope: ["scope1", "scope2"],
});

// Save the code verifier and state to the localStorage
localStorage.setItem("codeVerifier", codeVerifier);
localStorage.setItem("state", state);
This code redirects the user to the OAuth provider's login page. After the user logs in, they will be redirected back to your application. This code will extract the code and state from the URL, and exchange the code for an access token.
// Get query string
const query = Object.fromEntries(
  new URLSearchParams(window.location.search).entries()
);

// Error check
if (query.error) {
  // Handle error
  // ...

  // Logout
  localStorage.setItem("loggedIn", false);
}

// If the server returned an authorization code, attempt to exchange it for an access token
if (query.code) {
  const codeVerifier = localStorage.getItem("codeVerifier");
  const state = localStorage.getItem("state");

  const oauth2Token = await client.authorizationCode.getTokenFromCodeRedirect(
    document.location as any,
    {
      /**
       * The redirect URI is not actually used for any redirects, but MUST be the
       * same as what you passed earlier to "authorizationCode"
       */
      redirectUri: config.redirect_uri,

      state,
      codeVerifier,
    }
  );

  // Save the token object to localStorage
  localStorage.setItem("token", JSON.stringify(oauth2Token));
}

// Clear query string
window.history.replaceState({}, null, location.pathname);
Logging out
To log out, simply remove the token from localStorage and set loggedIn to false:
localStorage.removeItem("token");
localStorage.setItem("loggedIn", false);
Making requests
To do this we need to setup the FetchWrapper:
const fetchWrapper = new OAuth2Fetch({
  client,

  getNewToken: () => {
    // This method will only be called when refreshing the tokens fails
    // You should log the user in again here

    // `return null` if you want to fail this step
  },

  storeToken: (token) => {
    // This method will be called when the token is refreshed
    // You should save the token to localStorage here
    localStorage.setItem("token", JSON.stringify(token));
  },
  },

  getStoredToken: () => {
    // This method will be called to get the token from storage
    return JSON.parse(localStorage.getItem("token"));
  },
});
To send a request, simply call fetchWrapper.fetch which behaves similarly to plain old fetch:
const response = await fetchWrapper.fetch("https://my-api.example/");

// Obviously do some error handling too...

const data = response.json();
This FetchWrapper will automatically refresh the token when it expires, and retry the request. It will also handle sending the access tokens.
Is it secure to store the token in localStorage?
The main issue with localStorage is that it can be accessed by JS. In modern applications, you will often have thousands of dependencies, and if any of them are compromised then you could end up with an XSS attack. You can partially mitigate this risk with a strong Content Security Policy. The JS supply chain is quite resilient to compromised packages, with them being taken down quickly, and the community being notified. It is also very hard to pull off such a targeted attack, through a compromised package.
However, let's assume that your app is already compromised through XSS. Even if the token was not stored in localStorage, there would be some other mechanism to make API requests (possibly through a proxy server which stores tokens as HTTP-only cookies), and the attacker could still use that by sending requests from the context of your app.
In our case, the attacker will be able to access the token from localStorage, and possibly use it even when the user does not have the app open. However, there is a measure against this called refresh token rotation.
Refresh Token Rotation
Refresh token rotation ensures that only one party is using the tokens at one time. This prevents attackers from stealing the token and using it outside the application. It goes hand in hand with short-lived access tokens.
Short-lived access tokens
Access tokens should be short-lived, and expire after a short period of time. This could be anywhere from 5 minutes to 1 hour. This means that even if the attacker steals the token, they can only use it for a short period of time, before they have to use the refresh token to refresh it.
The security advantage of refresh token rotation
When the client requests a new access token, it also receives a new refresh token. If a malcious client uses the same refresh token to retrieve a new access token, the server will detect that the refresh token has been used twice, and will revoke all refresh and access tokens. This means that the attacker cannot use the refresh token outside the application, as it will be revoked as soon as the user opens the app.
Read more about refresh token rotation here.